Buses and accessible stops
Lifts, ramps and kneeling buses
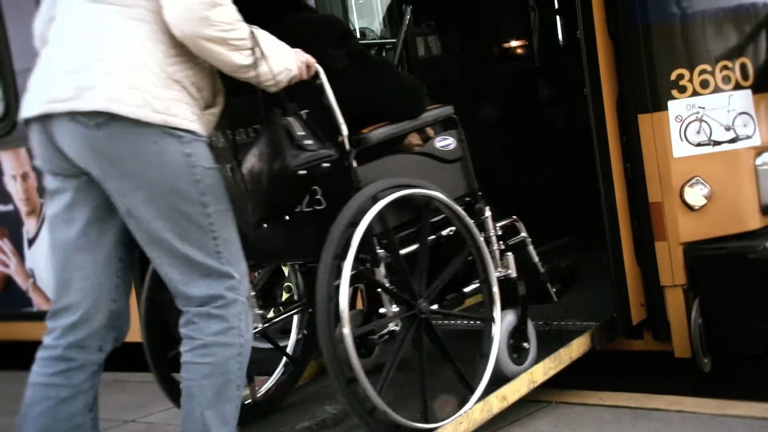
All Metro buses have wheelchair accessible lifts with ramps inside the front door. Whether you’re using a mobility device or just need some extra help boarding or exiting, please ask your driver for the lift. Our buses can also kneel, which means the floor of the bus is lowered to meet you closer to the sidewalk.
Accessible bus stops
Make sure your bus stop is “accessible” before you travel—this means that the bus lift can only be used at certain bus stops.

For accessible bus stop information, you can also call Metro at 206-553-3000.
Calling out bus stops
Metro buses have automatic audio and visual stop announcements and reader boards. Both systems will let you know when the bus has reached your stop. Our buses also feature audio announcements on the outside, to inform you of a bus’s route and destination as it pulls into your stop.
What Metro does
All of Metro’s drivers receive training about the importance of stop and route announcements. Metro's policy is to announce all stop locations and all bus routes that serve each bus stop.
Metro worked with blind, visually impaired and cognitively disabled riders to create our current bus stop announcement system and our driver training program. Drivers use the automatic stop announcement system on buses when available. If the system is not available, Metro requires drivers to use a microphone or speak loudly to announce stops and routes.
Priority seating
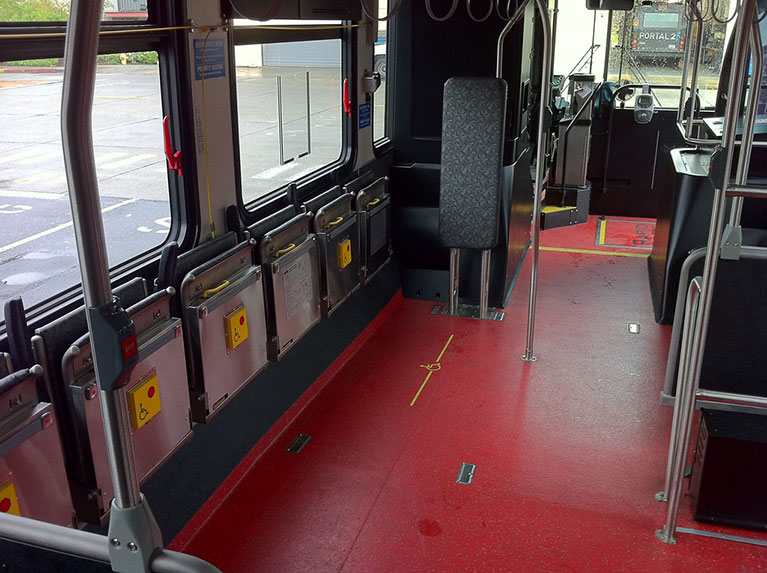
If the priority seats are full and you need to sit at the front of the bus, please tell your driver. The driver will ask riders in the priority area to make a seat available if possible, but no one is required to move. Please remember, some disabilities are not visible and no disability has priority over another.
Riding with your mobility device
Your mobility device can be taken on the bus if you can load it safely on board and it can be secured safely. Mobility devices fitting the following descriptions are allowed on the bus and must be secured in the priority area or folded under your seat.
- Designed for and used by individuals with mobility needs
- Can be used indoors
- Can be powered up and down or operated manually
Non-traditional mobility aids must be secured or stored under or between the seats.
If you have any concerns about your mobility device fitting on the bus, you can set up an appointment with Metro's Transit Instructors. They can also help you find the best way to secure your device.
Help when riding
Sometimes it’s the little things that make it possible to ride the bus with a disability, and our drivers are here to help! Maybe you need a driver to tap your ORCA card. Or to stop the bus where you can board or exit with less trouble. Metro drivers make these exceptions whenever possible, so please ask. If a driver cannot help with your request, they should tell you why. If you feel uncomfortable with any trip, please contact Metro Customer Service.
Special assistance tools
In the mid 80’s, Metro staff and an advisory committee of blind and DeafBlind transit users worked together to create the use of special assistance cards and bus identifier kits. These tools can be used by passengers with disabilities—and riders with limited communication skills—to tell drivers which routes they’d like to ride.
Special assistance cards
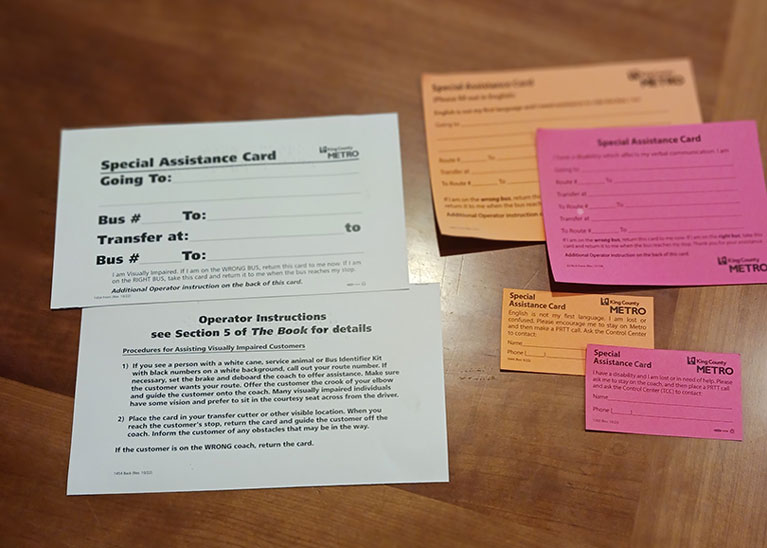
- A special assistance card is made of paper and comes in four colors.
- Larger cards include space for you or a helper to write in your name, where you are going and your bus route(s).
- Smaller cards—available in orange and pink—include space to list your emergency contact information.
There are four colors of special assistance cards
| Card color | Rider profile |
|---|---|
| White | Blind riders |
| Yellow | DeafBlind riders |
| Orange | Riders with limited English skills |
| Pink | Riders with limited communication skills |
Bus identifier kits
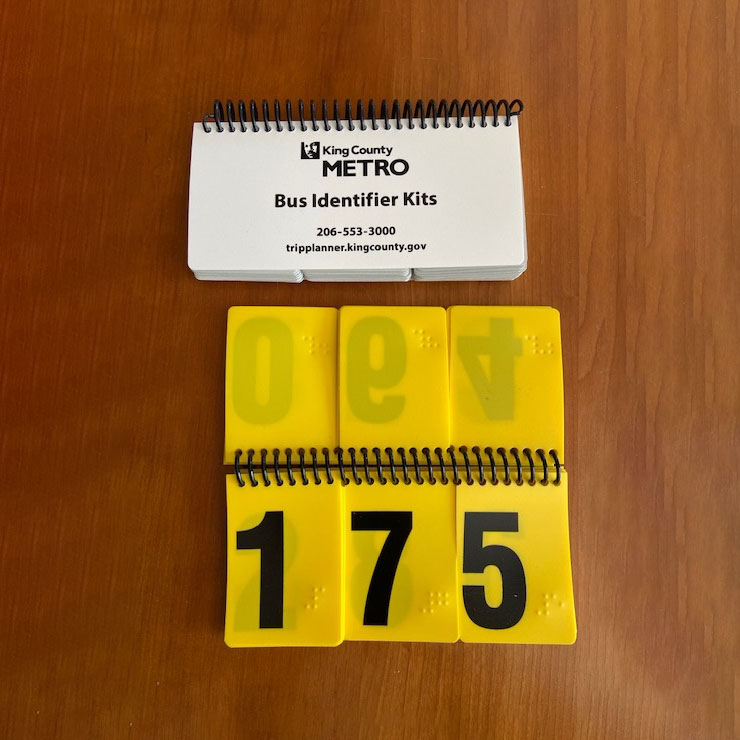
Bus identifier kits are made of hard plastic and held together with a spiral plastic binding. They come in two colors and feature bus route numbers and letters (and other transportation options) on the front of their tabs.
There are two colors of bus identifier kits
| Kit color | Rider profile |
|---|---|
| White | Blind riders |
| Yellow | DeafBlind riders |
Steps for riders using a special assistance card or bus identifier kit
-
Fill out your special assistance card
For special assistance cards, write down your bus numbers, destinations and your name. If you need help, please ask a caregiver, friend or family member before your trip.
-
Flip to your route with a bus identifier kit
If you are using a bus identifier kit, use the plastic tabs to display your bus route’s number or letter.
- There are three across tabs for numbers 0 through 9.
- There are three across tabs for letters A through L.
- Each number and letter tab also has braille to tell you what text is showing on the front of each tab.
- There are larger tabs at the back for the words Access, taxi and Uber/Lyft.
-
Waiting at your bus stop
Hold your special assistance card or bus identifier kit in front of your body while waiting at a bus stop, so that bus operators (drivers) can see you and your card/kit.
-
Drivers can help you
An operator will exit their bus if their route matches the one on your special assistance or bus identifier card.
If you are a Blind or DeafBlind rider, the driver will tap your forearm to get your attention. They will use the print on palm method to print their bus route number or letter on the open palm of your hand with their fingertips.
-
Board the bus
For Blind or DeafBlind riders, the driver will place your hand on their arm, guide you onto the bus, assist you with tapping your ORCA card and help you find a seat.
-
While you ride
For any passenger with a special assistance card, the operator will read your card and keep it with them until your stop.
-
Exit the bus
When the bus reaches your stop, the driver will get your attention (or tap your forearm if you are blind or DeafBlind). They will return your special assistance card (if you have one) and help you off the bus.
Service animals and pets
Service animals
- Service animals for persons with disabilities can ride Metro for free.
- Service animals must remain on their owner's lap or on the floor, without blocking the aisle. If this is not an option, the service animal may occupy a seat if one is available.
Pets
- Small dogs that stay on their owner's lap can ride for free. Fare for all other dogs must be paid.
- Pets other than dogs are not allowed on Metro unless they are in a carrier. Fare is not required.
If a service animal's or pet’s behavior threatens the safety or comfort of the driver or other passengers, their owner will be asked to exit the bus along with the animal. Boarding can also be denied from the beginning of a trip for safety reasons.
FAQ
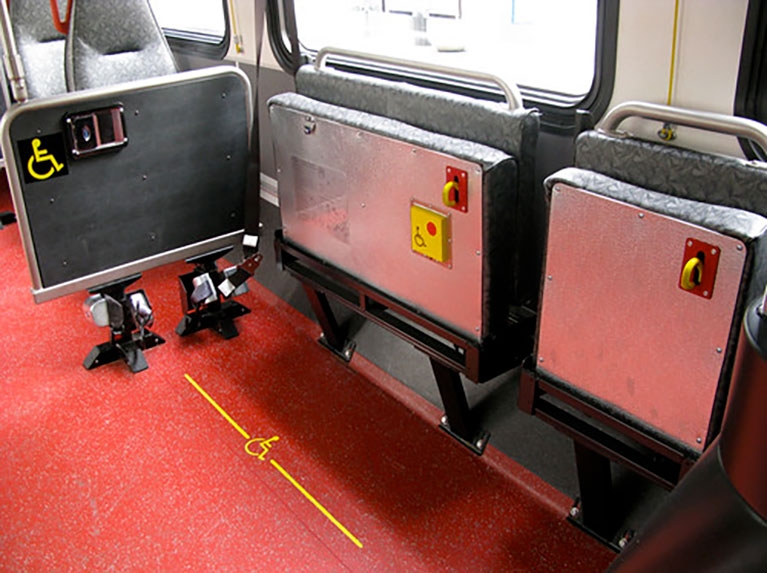
The seats at the front of the Metro buses flip up to create a space for your wheelchair, scooter, or walker etc.
Your mobility device must be strapped in facing the front of the bus, except on most RapidRide buses that also have a passive restraint area.
Shoulder and lap belts are not required, but are available upon request.
Use the seat belt-type straps to keep your mobility device steady. Drivers will look to make sure that your device is secured safely before leaving the stop. If you have a mobility device that is difficult to secure, consider contacting Metro's Transit Instruction program for assistance in figuring out the best way to stay safe.
Walkers and other mobility devices should be stored out of the aisle either strapped in or folded and stored under your seat. These devices cannot be used to sit on during your ride.
If you need help securing your mobility device, let the driver know when you get on the bus and they can help.
When you board, let the driver know where you will be exiting–they can then park the bus properly at your stop.
Most buses have a yellow push button strip or red stop request button on the bottom of the priority area’s flip-up seats. About a block before your stop, press the strip button. The STOP REQUESTED sign will light up and a bell will ding. You can ask the driver for the lift/ramp and help with your safety straps.
Accessible strollers are not just for children with disabilities. If someone with a disability has a child, they may use the priority seating area for their stroller.
If you have a child with a disability or you yourself have a disability and cannot safely hold your child during the bus ride, you may request that the stroller be secured and your child remain in the stroller. When boarding the bus, an adult should ride the lift up with their child to control the stroller.
Accessible strollers may have a Metro-approved sticker (not required). For more information on how to get a sticker, contact Metro Customer Service.
The use of safety belts is unnecessary for most situations, but you can request one. (Your driver should provide one if your route has a steep uphill or downhill climb.)
We distribute bus identifier kits and special assistance cards.
Riders can request these items by emailing accessible.services@kingcounty.gov. Riders should fill out their special assistance cards before using them.
Riders can get free transit instruction for these and other rider tools by emailing transitinstruction@kingcounty.gov or by calling 206-749-4242.
Blind or DeafBlind riders can also get free transit instruction by calling The Lighthouse for the Blind, Inc. at 206-322-4200 and asking for the Orientation and Mobility department.
 Translate
